Setting up ENECTOR with convenience functions in the KSEM
Setting up the wallbox with convenience functions in the KSEM provides a wide range of additional options. With a PV system, functions such as Solar Pure Mode or Solar Plus Mode are possible. These can be selected as a function via the KSEM interface or using the KOSTAL Solar App. An activation code is required to set up the wallbox in the KSEM.
INFO

In order for the wallbox to be set up in the KOSTAL Smart Energy Meter (KSEM), this function must first be activated via an activation code in the KSEM.
The activation code can be purchased from the KOSTAL Solar online shop.
To access the shop, go to shop.kostal-solar-electric.com.
The following must be done to set up the wallbox with convenience functions in the KSEM:
- Purchase activation code from the online KOSTAL shop.
- Enter activation code in the Activation code menu. The new Wallboxmenu then appears.
- Add ENECTOR in the Wallbox menu.
- Add KOSTAL inverter in KSEM in the Inverter menu under devices. This sends the inverter data to the Solar Portal.
- Activate data transfer to the KOSTAL Solar Portal in the KSEM.
- Assign the KSEM to a system as a device in the KOSTAL Solar Portal.
Purchasing activation code for wallbox
To activate functions, you will need PLENTICOINs that you have to purchase in advance.
- The link shop.kostal-solar-electric.com will take you to the online KOSTAL Solar shop.
- You can use Serial number check to check which functions you are able to activate for the KOSTAL Smart Energy Meter / ENECTOR. To do this, enter the serial number of the KOSTAL Smart Energy Meter and press Start.
- Then select the ENECTOR (KSEM) wallbox convenience function.
- Use PLENTICOINs to purchase the function. You will then receive the activation code to activate the wallbox in the KSEM.
Entering activation code in KOSTAL Smart Energy Meter
The activation code is entered via the KSEM user interface.
- Log in to the KSEM on the user interface.
- Go to Activation code.
- Enter and confirm the 10-digit activation code for the wallbox.
- The new Wallboxmenu appears.
- Activation is complete.
Enabling RS485 interface
Go to Modbus settings. The RS485 interface to which wallbox communication is connected must be deactivated. Only then can the wallbox be assigned to an RS485 interface in the "Wallbox" menu.

- Go to Modbus settings.
- Under Modbus RTU, deactivate the RS485 interface (e.g. interface RS485 B) to which wallbox communication is connected.
- Press the Save button to adopt the settings.
Setting up and configuring the wallbox
The points, wallbox connection, selection of functions, current status of the wallbox in relation to the connection and charge/discharge power can be displayed under Wallbox.
INFO
The wallbox is supplied with the standard slave address 50. This is changed automatically during set-up in the KSEM. The wallbox is given slave address 100.
If a wallbox is deleted from the overview, slave address 50 is written back to the wallbox. The slave addresses issued are displayed in the overview.
If the KSEM is reset, the wallboxes are not automatically reset to the address 50. In such a scenario, the wallbox in the KSEM has to be set up afresh. Address 100 should then be entered in place of address 50 because this has already been changed in the wallbox.
INFO
If a vehicle is connected when setting up, the address is only automatically changed again later on.
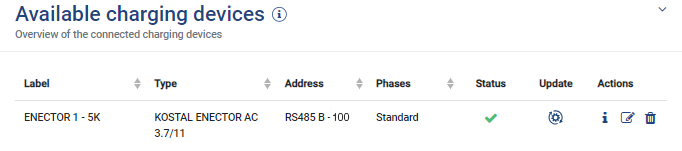
- If there is not yet a charging device present, the first charging device can be set up in the KOSTAL Smart Energy Meter via Add. Further charging devices can be added by going to Settings (cogwheel symbol) > Available charging devices.
- Give the wallbox a name.
- Select the approved RS485 interface (e.g. RS485 B) used to connect the wallbox to the KSEM.
- The slave address does not have to issued when setting up the wallbox.
- Save your input.
- The wallbox is set up.
You can then choose between the different charging modes.
Adding inverters in KOSTAL Smart Energy Meter
To ensure that all data is displayed correctly in the KOSTAL Solar Portal in combination with the wallbox, the KOSTAL inverter must be added under Inverter > Devices . Further information can be found in the KOSTAL Smart Energy Meter operating manual.
Activating data transfer to the KOSTAL Solar Portal in the KOSTAL Smart Energy Meter
Data transfer must be activated so that the wallbox data is also visible in the KOSTAL Solar Portal.
- Go to Solar Portal, press the Activate solar portal switch.
- Transfer is activated
INFO
Incorrect time information during data transfer to the KOSTAL Solar Portal
Check the time and time zone set in the KOSTAL Smart Energy Meter and correct them if necessary. If the time is set incorrectly, the data will be transferred from KSEM with incorrect time information and will not be displayed correctly in the KOSTAL Solar Portal.
Assigning the KOSTAL Smart Energy Meter to a system in the KOSTAL Solar Portal
All KOSTAL inverters and the KOSTAL Smart Energy Meter must be assigned to a PV system in the KOSTAL Solar Portal. If this was not been done when setting up your PV system, you must do it now.
- To do this, log in to the KOSTAL Solar Portal.
- Select a system or create a new one.
- Now add the KOSTAL Smart Energy Meter to this system using the article and serial number. These can be found in the Solar Portal menu in the KOSTAL Smart Energy Meter:
- The KOSTAL Smart Energy Meter has been set up in the KOSTAL Solar Portal. This means that the data can now be accessed in the KOSTAL Solar Portal and in the KOSTAL Solar App.
INFO
Wallbox charging data
The Solar Portal / Solar App only displays the wallbox charging data or the link between the wallbox and the KOSTAL Solar App once the wallbox has been set up and the initial charging process is complete.